RUSS' OLD RADIOS
  • HOME
  • FOR SALE
    • CURRENTLY AVAILABLE
    • DO IT YOURSELF SPECIALS
    • EXCEPTIONAL DEALS
    • WITH MP3 PORTS
  • RESTORATION
  • BLOG
  • BEFORE/AFTER
  • CONTACT US
  • UNIQUE RADIOS
  • 1920'S Superheterodyne

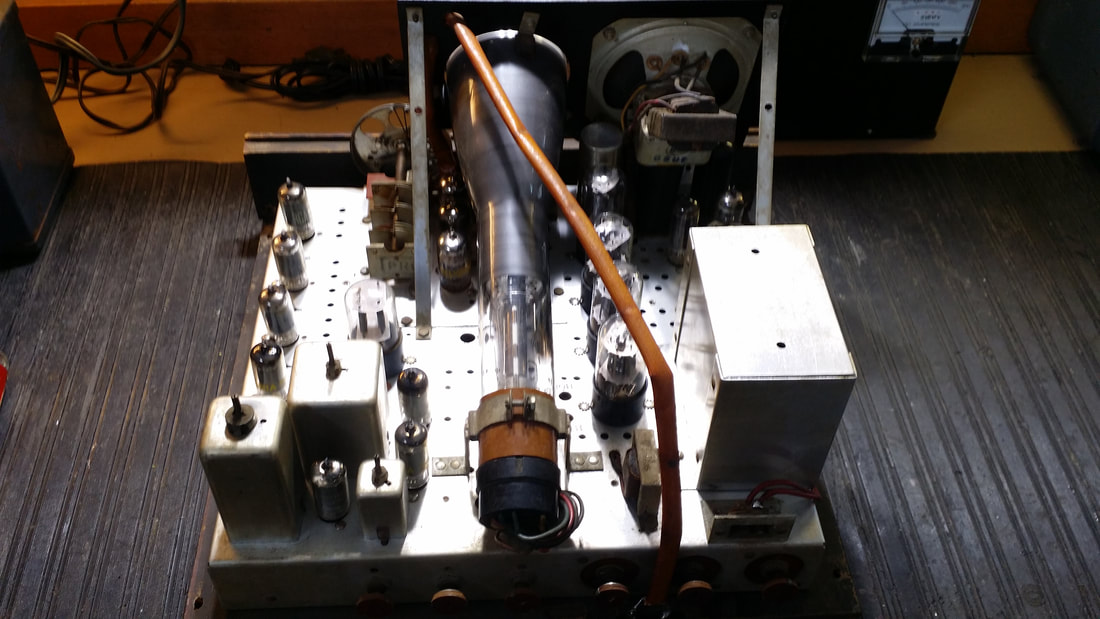
Pilot 3" "Color" TV from 1948

2/23/2018

1 Comment

 
OK, OK, the only color is green.

Sold in 1948, this was one of the first budget TVs. This brings back memories of long lines of people waiting for the "Black Friday" sale at Circuit City when flat screens first became the "hot" Christmas gift. These were no less popular.

The $99 price was the best part of this TV. The real drawback was the 3" screen. Continuous variable tuning on  2 bands was a cost saver, but I find tuning to be easy, maybe easier than the click , click/fine tune two step of a conventional TV tuner.

The picture tubes were not green phosphor as sold. The original CRT must have failed and prior to my restoration somebody installed a oscilloscope tube. An original replacement is very hard to find today. The green doesn't make watching a 3" tube any better.

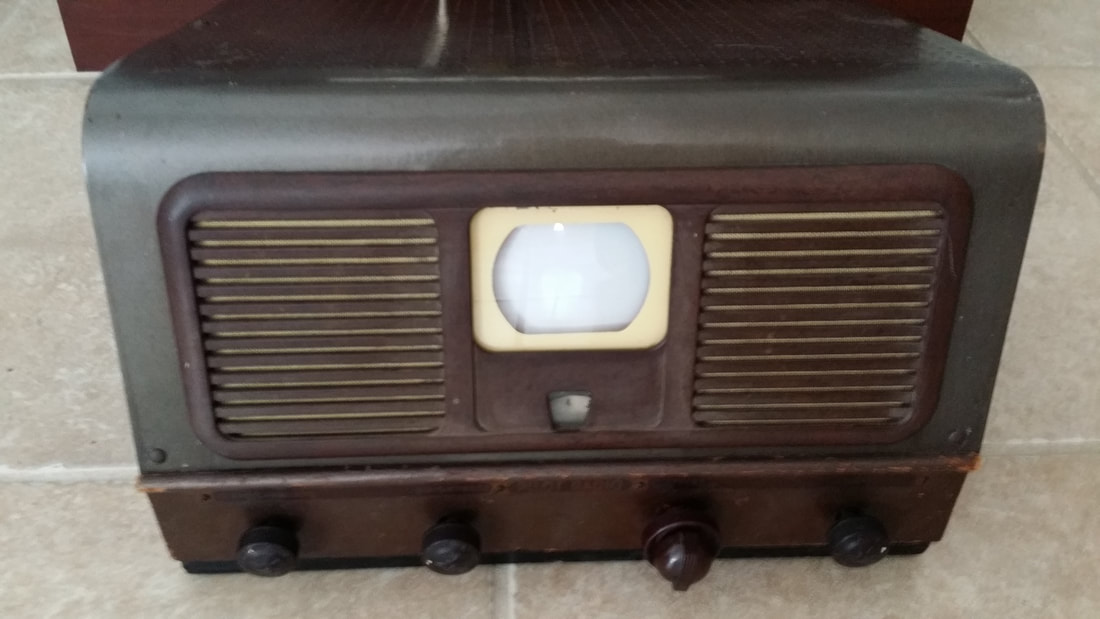
Picture
TV are not something I have not put much effort into, but I always wanted a small "roundie" TV for the museum.
Picture
It is hard to take a movie of a changing/reflective surface, but I tried: The input is from a HD to channel 3 (NTSC) analog converter - Below
1 Comment

Who Looks Under A Chassis?

2/16/2018

1 Comment

 
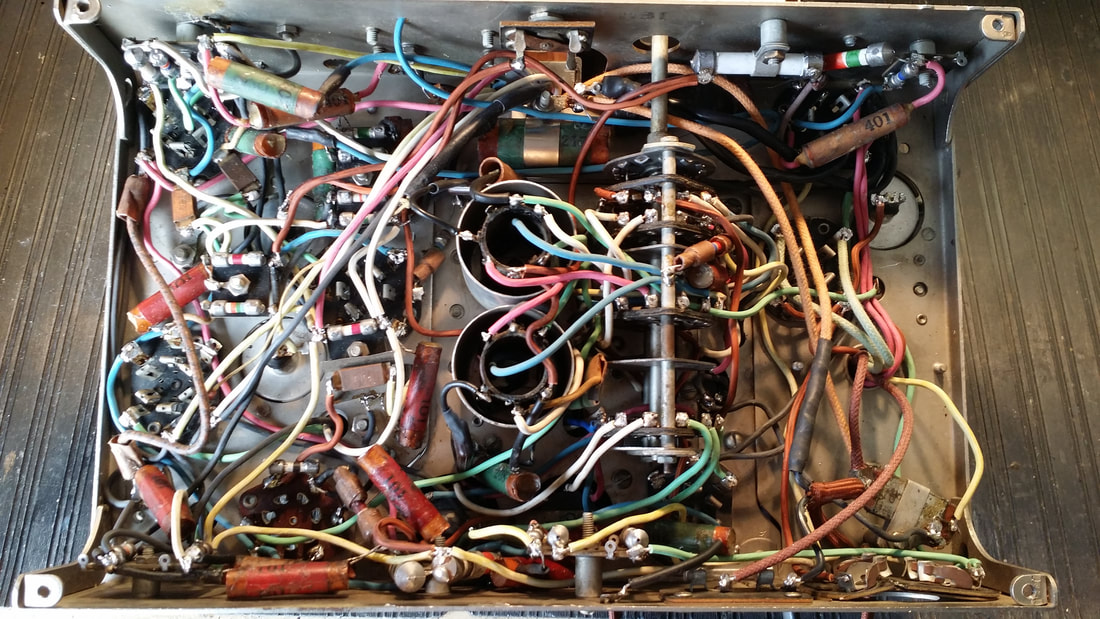
     I have often encountered some resistance while discussing chassis restoration. In particular the aspect of "restuffing" the original paper capacitors seems to be a step too far for some people.

"I don't feel the need to do that". Well, that is OK, don't. And this one - "No one ever looks under the chassis". To that I say it is both untrue and somewhat ridiculous, since there is much more involved. I find this of particular interest in today's environment of "MAGA" which implies that we need higher quality and workmanship - like the "good old days".

This attitude is often associated with shoddy workmanship. If the builder of your home uses less concrete in the foundation because "no one will ever see it", Let's hope the building inspector catches him. This is why antique radio buyers WANT to see the underside of the restored chassis, unless the radio is very cheap.

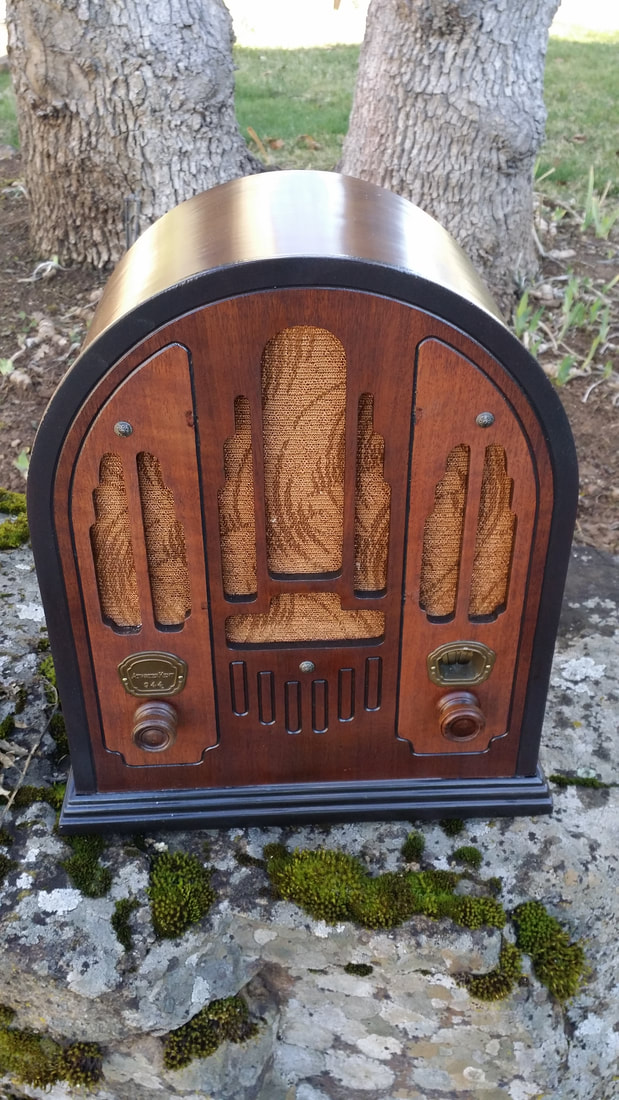
But don't focus too much on restuffing caps, there is a lot more to "restoration" than just the caps. Let's look at a radio I am working on right now. It is an AK (Atwater Kent) 944 from 1934/35.

This radio was working when I acquired it in a large lot last month. The cabinet had been "antiqued". The heavy paint covered up missing and split veneers and holes filled with putty - it was a total loss. So, this fellow did some less-than-perfect cabinet work. Good thing I had another cabinet!

Lets move on to the chassis. It is clear that he did have some electronic experience. He either needed to replace the original volume control or had problems with audio level not uncommon to this set. So he installed a ganged pot that also controlled bias to the audio output tube. IMO not the correct thing to do but still proving this was not his first radio.


Picture
Above: A finished AK 447 chassis showing all of the aspects of restoration including but not limited to caps, resistors, wire and MOSTLY, proper soldering technique.


Can I tell you a short story? Well - - Around 1992 the "cellular revolution" was in full bloom. I was a tech working for GTE (later US West, later, Airtouch, later Vodafone, later - - you get the idea). Cell phones were not cheap, especially if you had to replace one without the "bundled" contract. They were so expensive that my employer(s) feared the loss of customers that would disconnect rather than buy a new phone. It became my job to insure that this did not happen - but there was a problem. The compact design (surface mounted devices) while not new, was going to new heights with the new compact handsets. The manufactures quickly found that phones exposed to existing repair techniques were being destroyed.

The result was that almost all warranty repairs (3 year warranty) were required to be sent back to the factory. The real problem for my employer was the need to keep hundreds, maybe thousands of loaner phones since the repair process could take weeks or longer. I needed to resolve this issue.

Contacting the individual manufactures was mostly like banging your head on the wall. I approached the FTR for OKI, a nice guy that really knew what he was doing. He told me what I had suspected. It all came down to field technicians NOT KNOWING HOW TO SOLDER. OKI set up a training course for about 5 people. I found out that I did not know everything. I also found out that I did not have the proper tools. OH - ALSO there was a test.

To make a long story shorter, my employer invested thousands of $$ in all of the proper stuff - 5 element de-soldering stations with suction, static safe workstations, and a lot of parts. We became one of the first authorized field repair centers and I got a plaque for the wall. Within a few months the other manufactures fell inline. One of my most satisfying moments was when my former boss, the owner of a MSS had to bring his phone to me for repair - he was the guy that said "There is no future in consumer electronics".  Also - he is out of business now.


Picture
Above: AK 944
Picture
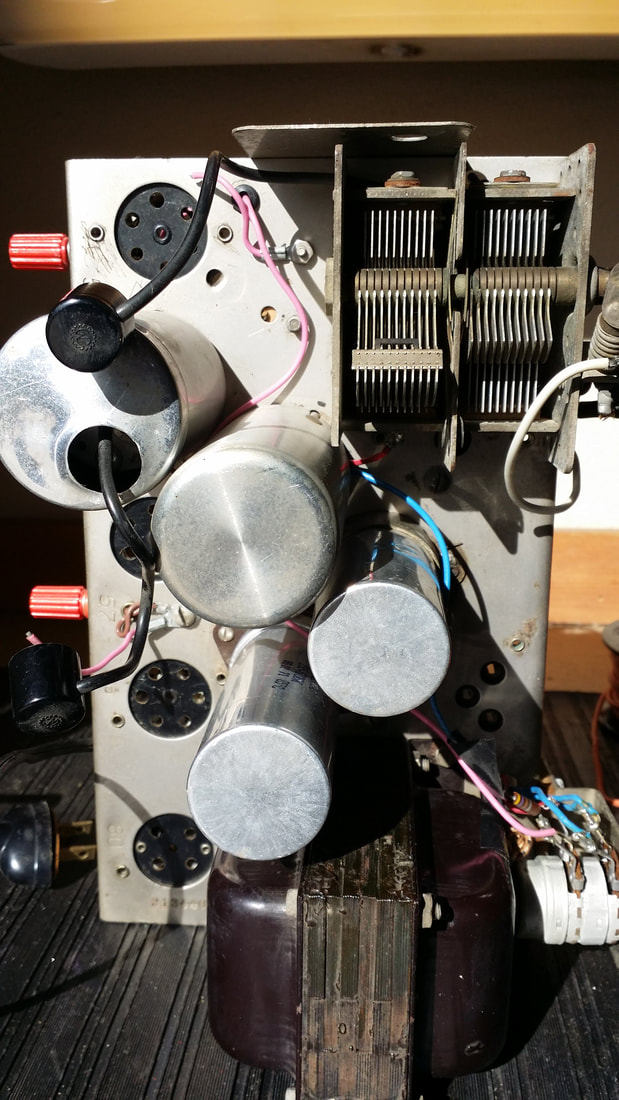
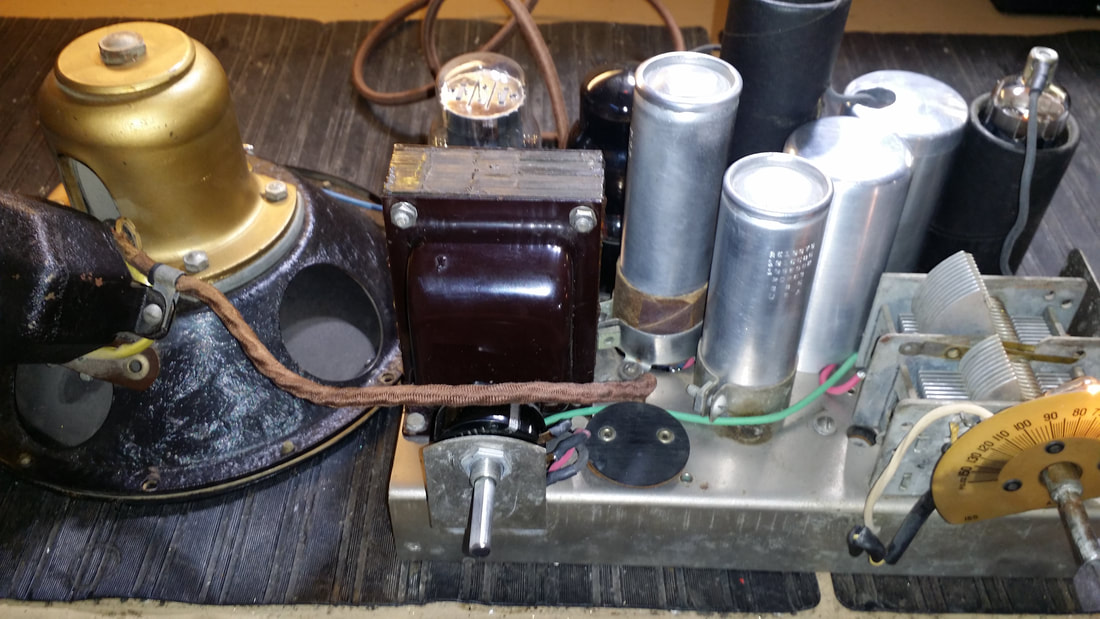
Back to the AK 944 chassis. Above is the top side. Looks ok, if you don't look too hard. In the lower rt. is the new volume control. Since it needed more depth than the original it had been spaced out by a block of wood - yeah it caused the control to impact the cabinet but it worked - sort of.

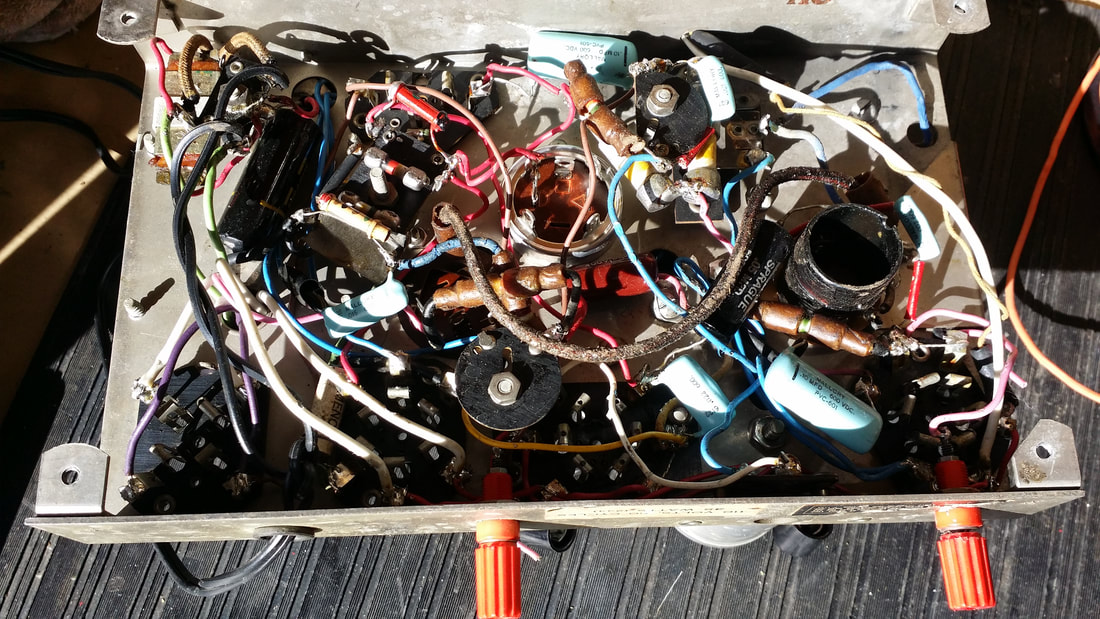
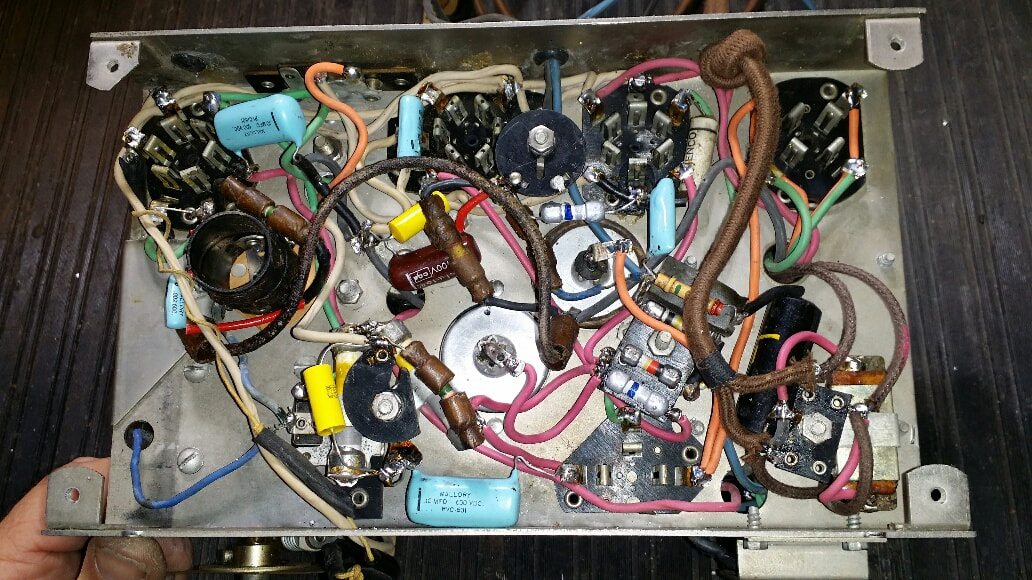
Let's take a look at that plastic insulated wire. Do you think it is rated for 600V? Maybe it is rated for 50V or not at all. The one thing for sure is that it is a mess (and the wrong color) (And if you new guys don't think this is important, tell me where the "black" wire specified on the schematic is supposed to go.) Yeah he only had 3 or 4 colors and was not too particular as to which he used. Can you see the solder joints?
Picture
Picture
Above; As found.

The thing I find most striking is the congestion and clutter caused by this repair technique. Let me say at this point that what you see here is above average work.

So what else can we see? Novel - the mounting of a "new" filter can - which is more than 30 years old. I'll bet it was "NOS" when he chose to use it. DO NOT use old filter caps. They generally do not age well. Anyway he pushed it up through the bottom. I think this is the first time I have seen this and while certainly creative it is not "restoration".

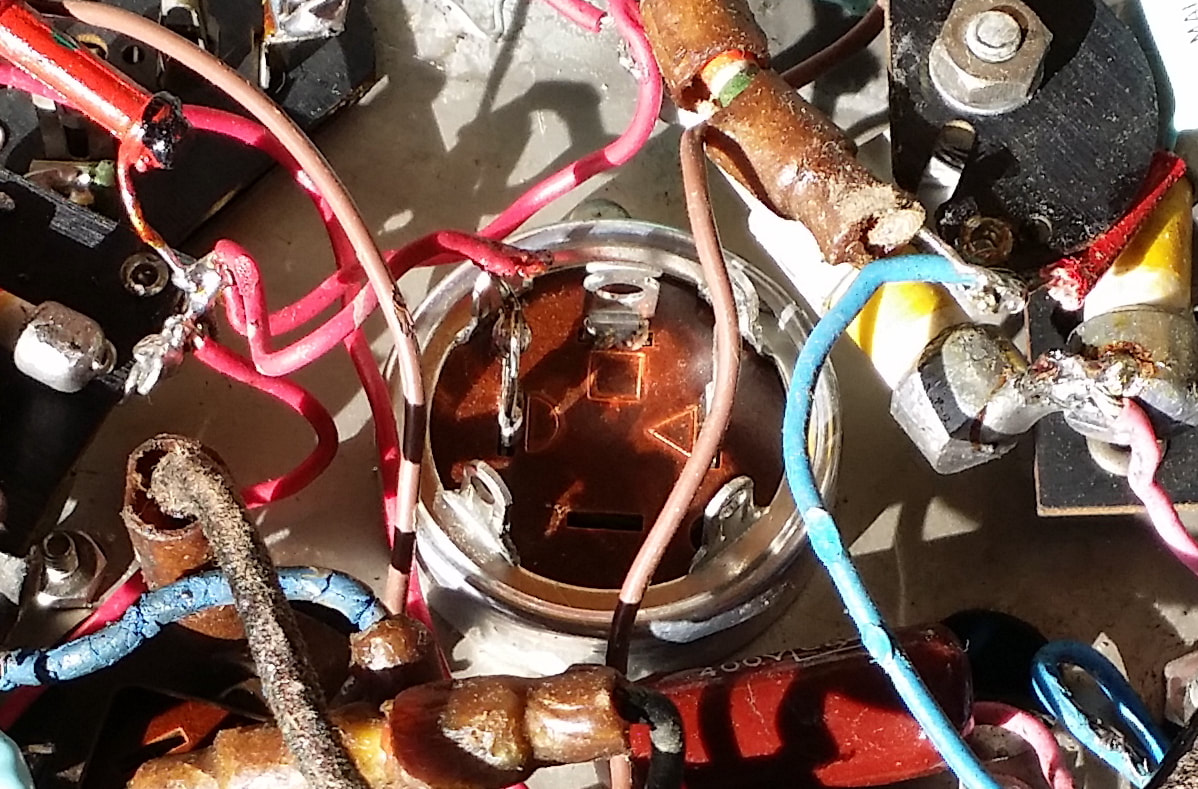
Glob and blob solder technique. The real trick is to get the joint HOT - FAST. Get a nice shiny joint without overheating the other components. My iron is at 800 deg.F. before I start, pig tails are cut or straitened - yeah, solder is weak. You can pull the wire out of a solder joint which is why wires/leads need to be wrapped around connections. If you have to screw with the wire/components as you make the joint you are going to burn stuff up.

Melted insulation on "new" wire. Probably going to work but it sure looks bad. Taken to an extreme, it will result in shorts. This plastic insulator melts easily. It leaves ugly burnt marks even at good joints. I have found that the new EPDM insulated wire not only looks right but the insulation is nearly impossible to scorch let alone melt.

Some of the old rubber insulated wire was just too tough to get to or replacement was deemed unnecessary.  Give that blue lead on the resistor a few more years, it will be a bare wire. HOPE it does not short. When you are doing a rewire job like this, replace all of the original wire.

Extra connectors, while convenient they detract from a proper restoration. If you NEED an MP3 port, add the jack in such a way that it can be removed. Future owners will thank you.

Modern parts - detract from the "restored appearance of the chassis. Capacitors can be restuffed, if not, save the old ones for a future owner. I still need to locate the original AK caps for this unit. This is often the biggest challenge I have in doing a restoration. I also rewind or otherwise repair transformers and coils, and cast new resistors so they look like the originals.


Picture
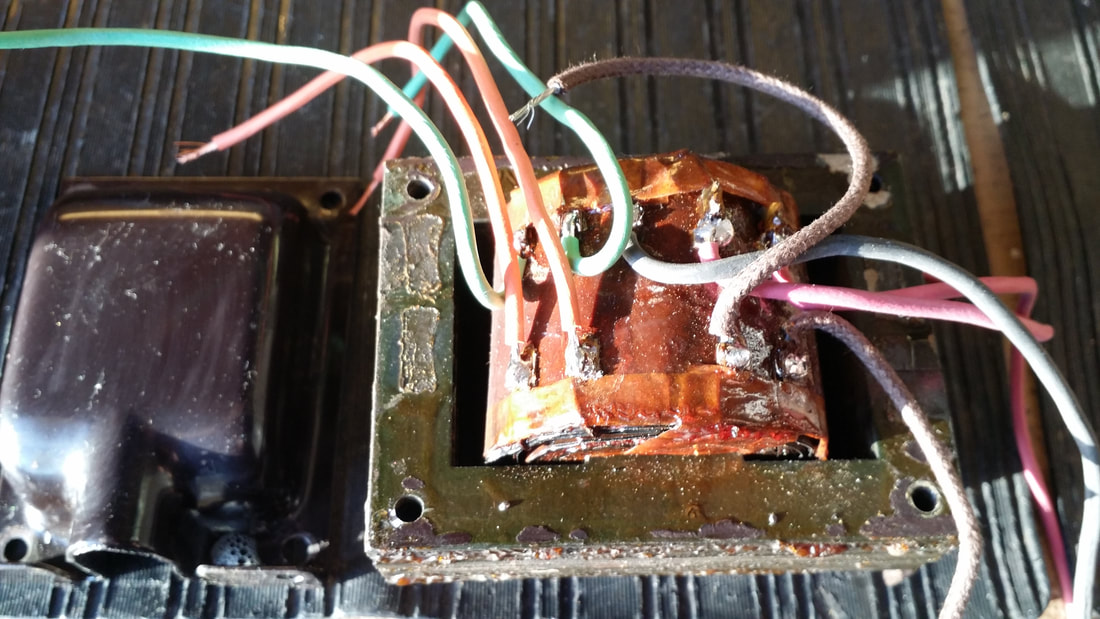
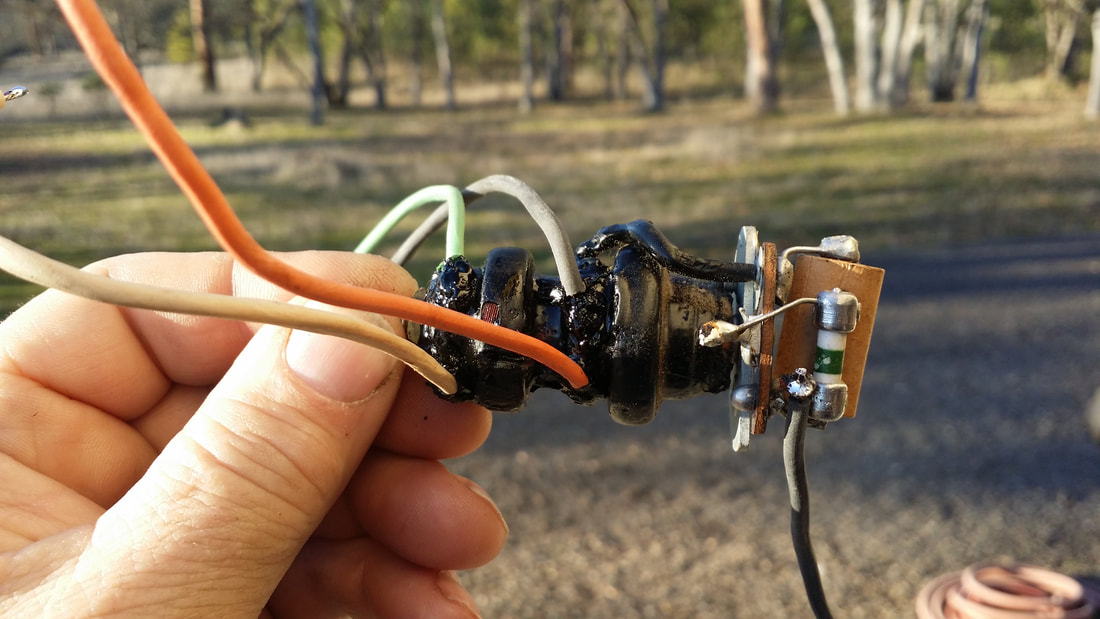
Above: Showing the lands/connections on an AK power transformer. ALL 1930s AK power transformers need to have the leads replaced. The original rubber insulated leads will short and cause an expensive failure. DO NOT trust the original wire.
Picture
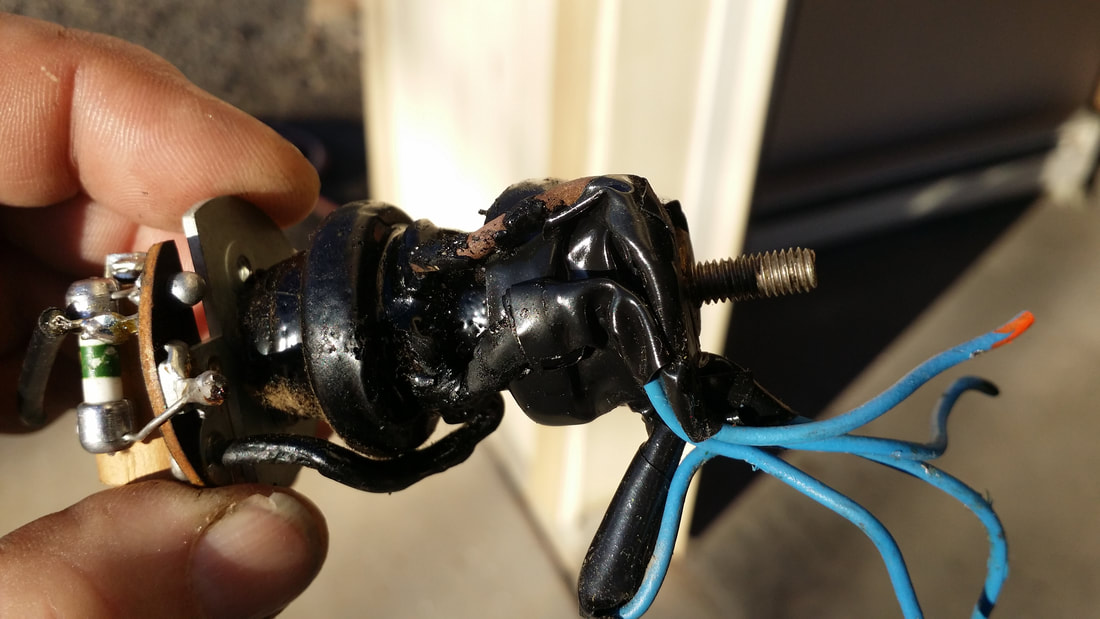
Other AK coils are no different from the power transformers. Above is the IF transformer. At least the original tech chose to replace the wire. Unfortunately he chose to cut/splice and then wrap his connections in vinyl tape. I would have given him more slack if he had at least used heat shrink. I will again point out the wire and single color - not a restoration. You know why vinyl tape is not up to code for most electrical work? If you have to use tape, learn how to use the old friction tape - It can last for decades - or better yet do not use tape OR splices. These transformers also have lands (experience is worth something). See below.
Picture
Above: Wire/connections properly installed on the IF transformer. (no tape)
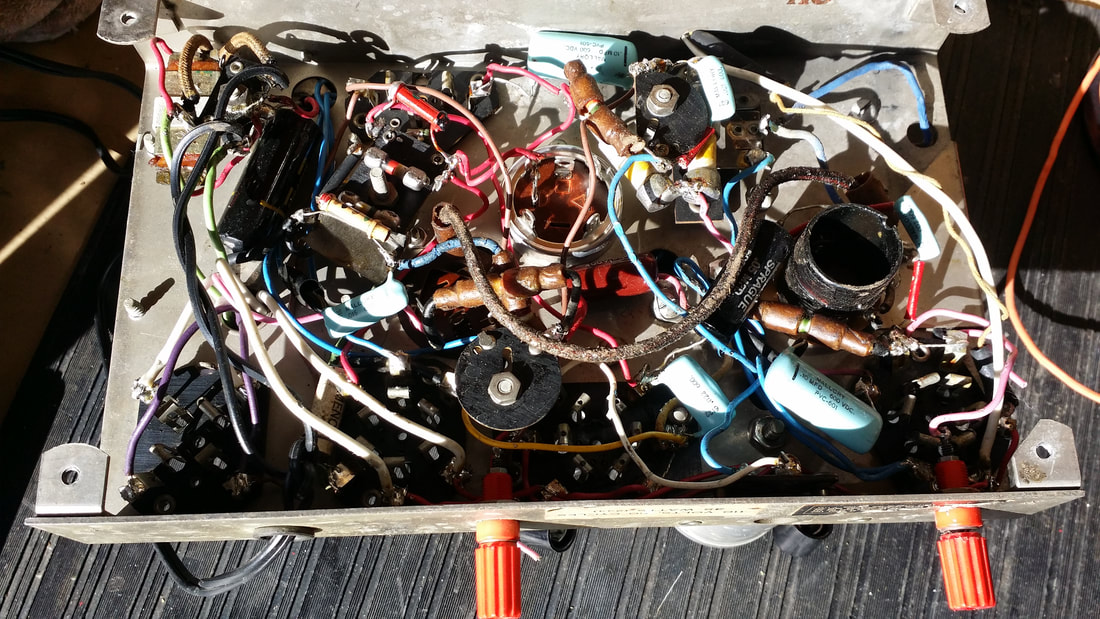
Below: A comparison of the chassis before and after. I still have to locate the original paper caps and I will restuff them, but if you choose not to, this is how your chassis should look. Note that one of his new caps had failed and one was the wrong value. Those two are yellow - for the moment.

See the new resistors? These, small AK resistors are too small for my ceramic tubes. On larger values I reuse the original lead ends. With these the whole resistor is recast and painted. Maybe one day I will start making new metal ends. (Construction is end - tube - end with a new resistor in the tube. All new resistors are at least twice the original rating but more often 4 to 12 times the ratings. For example a 1/4 watt resistor actually has a 2 watt resistor inside.
Picture
Picture
OK, you don't have to tell me that this is over the top. I have also heard from "professionals" (NEVER trust your radio to someone who is not licensed AND bonded). Several have stated that they would "tell a customer where to go" if he asks for this kind of work. Well, I can save them the effort. If your "tech" does not want to restore a radio to your specifications - I'll tell you where to go -  - Someplace else.

I have also heard people say "People want unrestored radios and pay more for them". Yes, I want unrestored radios. There is a lot of extra work involved with fixing a radio like this one. And, a more correct statement is that people don't want improperly restored radios - true that some people don't want to pay for the additional time it takes. BUT, even if a tech does not restuff caps or cast resistors the result should still be like the first picture above, not like the second. Many techs will find, as I did,  that properly restored radios sell for a premium. If you are purchasing any radio ask to see the underside of the chassis. Restorers might already have a picture. If it is too "inconvenient" for the seller, assume the worst, don't pay much.

Some people say this takes too long. I can assure you that the first one or two WILL take too long. Is it better to have three radios restored poorly or one good one? I am not going to decide for you. I think that the real annoyance comes from owners that have paid for more and they got less or collectors that have a bunch of "repaired" but not restored radios. Sorry, I know how it feels. I have reworked many of the radios I repaired 20 years ago. Yes my skills have improved and I have found sources for better and or original (looking) parts. I have refinished one cabinet 3 times ;-)


So make your next radio the best it can be. And if you are new to the hobby - well, now you know.


Picture
So, while you might not look under a chassis, I am always going to do so.

Don't forget to push "like"
1 Comment

    Author

                         Russ Webb

    Picture
    Russ Webb & Fuzzy

    Best Buddy, Radio fixer


    Categories

    All
    All
    Antiques
    Electronics
    Radios
    Repair
    Restoration
    Travels
    Vintage

    RSS Feed

    Archives

    March 2023
    November 2022
    October 2022
    July 2022
    January 2022
    December 2021
    September 2021
    June 2021
    April 2021
    February 2021
    January 2021
    November 2020
    July 2020
    June 2020
    April 2020
    March 2020
    December 2019
    October 2019
    May 2019
    April 2019
    March 2019
    February 2019
    January 2019
    December 2018
    November 2018
    October 2018
    September 2018
    June 2018
    April 2018
    March 2018
    February 2018
    January 2018
    December 2017
    November 2017
    September 2017
    June 2017
    May 2017
    April 2017
    February 2017
    December 2016
    November 2016
    October 2016
    September 2016
    August 2016
    July 2016
    June 2016
    May 2016
    April 2016
    March 2016
    February 2016
    January 2016
    December 2015
    November 2015
    August 2015
    June 2015
    May 2015
    April 2015
    March 2015
    February 2015
    January 2015
    December 2014
    November 2014
    October 2014
    September 2014
    August 2014
    July 2014
    June 2014
    May 2014
    April 2014
    March 2014
    February 2014
    January 2014
    December 2013

CUSTOM DESIGN BY SUE WEBB  06/2013       Redesigned by Russ Webb     Approved by Fuzzy   Updated:  Pretty much all the time, but I forget to change this date
Proudly powered by Weebly
Photos used under Creative Commons from valart2008, rafeejewell